Gravity Forms is a WordPress plugin that allows you to put contact forms on your site for any number of purposes. They can range from simple “Contact Us” forms, to newsletter signups in the footer or requests for a quote for a service. Like any other key interaction on your website, forms can and should be tracked to gain a better understanding of visitors’ behaviours. There are a few ways to track forms in GA4 and we’ll cover two of them in this post. Firstly is simply setting a GA4 event using the “Form Submission” trigger inside Google Tag Manager. The second is a bit more in depth and requires placing a script on the form and setting up a listener. Both have their own advantages and disadvantages, which we’ll discuss below.
Before we dive in, if you are only interested in basic data, like how many times a form was submitted and on what landing page, then follow the Part 1 guide. If you want more in depth data, like if you have more than one form on your site and you want to know which gets more hits, skip ahead to Part 2. Let’s dive in.
Part 1. How to track Gravity Forms in GA4 with Google Tag Manager
As mentioned above, this is the quick and easy way to track a form, and luckily GTM has a trigger already built in. This method also works with any form, not just Gravity!
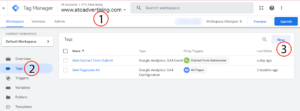
Step 1. Navigate to the correct GTM account, select tags, from the left side menu and then click New. This will open a new area with GTM where you can setup the tag.
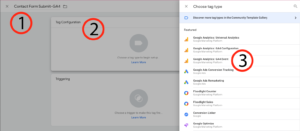
Step 2. Name the tag something relevant, in this case we named it, “Contact Form Submit-GA4.” Next, click the “Tag Configuration” box which will open a list of tag options. Select “Google Analytics: GA4 Event.”
Step 3. Set the measurement ID (if you followed our guide on setting up GA4, this is where you’d add your constant. If you have no idea what the measurement ID is, go back and check our guide to help you find it.) and name the event. In our case we named it “form_submit” but whatever name works for you will be fine as well.
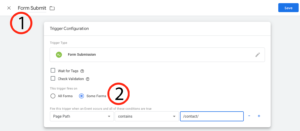
Step 4. Now you’ll need to setup a trigger. In this case we’re going to select the “Form Submission” trigger from the available list. We named our trigger “Form Submit” but like most things, you can name it whatever you want, as long as it makes sense to you and whoever works on this site after you.
Step 4a. There are a couple of options on how the trigger fires. If you only have one form on the site, go ahead and select “All Forms,” but if you have more than one, or you know you’ll have multiple in the future, you can set different parameters. In this case, we used the page path to tell GTM to only fire the tag if the form is on our Contact page.
Your finished tag should look something like this. Save it, publish the container and it doesn’t hurt to test fill and submit the form you want to track just to make sure it’s sending the data correctly.
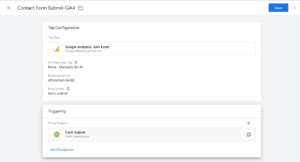
And that’s it, you’re now tracking your form. Congratulations and happy tagging!
Part 2. The deep dive & pulling more form data.
If you’re reading the deep dive, we’re going to assume you’re more familiar with GTM and GA4 than a beginner user, so we’ll skip some of the “where to find” parts of our guide. However, if you are a beginner, we suggest following Part 1 to familiarise yourself with GTM and GA4 and then following this part if you want the more in depth data pulled.
IMPORTANT: Before we begin, this guide will only support AJAX-based forms. If your contact page does not refresh after the form is submitted and displays confirmation text, then this will work fine. If the user is sent to a thank you page, then you’ll need to change the scripts.
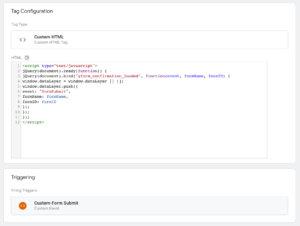
Step 1. The first thing you need to do is make a listener in Google Tag Manager. The listener will, as the name suggests, be listening for an event to occur that then fires the tag.
<script type="text/javascript">
jQuery(document).ready(function() {
jQuery(document).bind("gform_confirmation_loaded", function(event, formName, formID) {
window.dataLayer = window.dataLayer || [];
window.dataLayer.push({
event: "formSubmit",
formName: formName,
formID: formID
});
});
});
</script>
Step 2. Create a trigger for the listener to fire on. Make sure the event name is set to formSubmit. You also don’t want this trigger to fire on every event, so set it to fire only on events containing formSubmit.
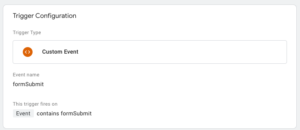
Your finished listener tag should look something like this.
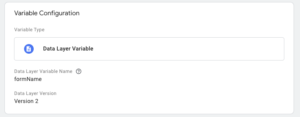
Step 2a. Before you make the Form Submit tag, you’ll need to setup some Variables for the name and ID tracking. You can setup any variables you feel are necessary, so long as you update the listener with the additional parameters you want to track. In this case, we only setup variables for the form ID and name.
Add a new variable and select data layer variable and give it a name that is relevant and easy to understand. Set the Data Layer Version to “Version 2” and save the variable. Repeat this step for however many variables you’re setting up for your forms and name them accordingly.
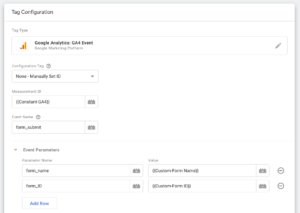
Step 3. Setup a new tag that will fire a GA4 event. The listener you setup earlier will help collect the data, but won’t actually send it to Analytics. Add the parameters you made earlier and name them something relevant. While the names themselves don’t need to exactly match this, make sure you note them down as you’ll need to reference them in the next steps.
The parameter values will be whatever you named the custom variables from step 2a. You can either click the + inside the brick icon, or type the name of the variable inside braces, like in the screenshot below.
That’s it for the GTM side of things, go ahead and publish the container!
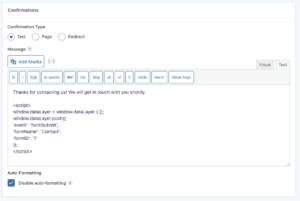
Step 4. Now we have our listener and event tags in place, we need to add a Data Layer Variable to the form itself so the listener knows what information to pull. Place the following script on the confirmation of your form. The parameters can be updated to match whatever you want to pull, but remember to have the listener match. The event shouldn’t change, but the formName and formID should be updated to relate to whatever form you’re placing this on. In this case, this is our contact form and has its ID of 1.
<script>
window.dataLayer = window.dataLayer || [];
window.dataLayer.push({
'event': 'formSubmit',
'formName': 'Contact',
'formID': '1'
});
</script>
Make sure you add the script in the text editor and not the visual editor and disable auto-formatting. Your script won’t work otherwise! Remember to save the confirmation before you exit the form builder or start any testing.
Step 5. It’s time to tell GA4 to look for the parameters you setup so you’ll be able to use them in reports. Navigate to you Analytics property and go to admin, then under the property column select Custom Definitions. This used to live in the Configuration section in the left side navigation, but has since been moved to admin. If your GA4 property was setup earlier, it may still live in the Configuration section, but if not, you’ll be directed to admin by GA4.
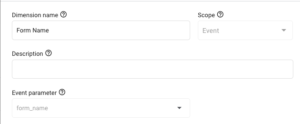
Once in Custom Definitions, you’ll want to create new custom definitions and match the parameters to what you set them as in the custom variables from step 2a. The definition name can be whatever you want it to be, but make sure the Event Parameter exactly matches your variable. It’s okay if the parameter doesn’t appear in the drop down menu, just type it and save the custom dimension.
Repeat this step for all the custom dimensions you’ll want to setup and you’re done! We generally wait an hour or so to test the forms are sending the correct information to Analytics in the real time section.
If this post was helpful for you, why not check out some of our other Analytics and Tag Manager posts? We wrote a pretty good one about the differences between the two. Got some questions or need help setting up these tags? Send us a message or comment below. Happy tagging!